Building Desktop Apps with Electron JS: Part 1 - Getting Started with Electron
I want to tell you my story of how I built my first desktop application.


Table of contents
- Let’s start with an overview of what we’ll cover in each part of the series.
- Getting Started with Electron JS
- 1. Create a new directory for your project, navigate to it and in your terminal initialize a new Node.js project with the following command:
- 2. Next we want to install Electron.Js:
- 3. Create a new file named main.js in the root of your project directory.
- 4. Create a new file named index.html in the root of your project directory.
- 5. Add the following code to index.html to display a basic web page:
- 6. Now inside the main.js insert after createWindow();, this function tells the app when it’s ready to initiate.
- 7. Run Electron
I had zero knowledge of how I would get started but surely had heard of Electron.js before because of its name: “Electron”, it has a nice catch, during my studies which involved chemistry engineering (long story).
I came across it while I was working on my software development learning (not even JS, I was learning python and C++ back then) and somehow memorized its name and functionality so that you can build a desktop application using JavaScript.
Before I begin to explain in detail I have to mention that this is going to be a complete series starting from beginner to advanced such as using also one of the latest frameworks as the main frontend/renderer part, that being either React or Angular. Although you need to have some basic knowledge of JavaScript.
With Electron, you can develop applications that work on Windows, macOS, and Linux using a single JavaScript codebase. It eliminates the need for native development experience, making it a cross-platform solution.
Some of the most well-known desktop applications that are built on Electron include:
Visual Studio Code: Microsoft’s popular code editor
Slack: The popular team communication platform
Discord: Another popular chat and voice communication app
Atom: Another code editor
GitHub Desktop: The official desktop client for the popular code hosting platform GitHub
Microsoft Teams
Let’s start with an overview of what we’ll cover in each part of the series.
Part 1: Introduction to Electron JS
What is Electron JS?
Setting up our development environment
Creating a window with a simple “Hello World” message
Adding some basic functionalities
Part 2: Using Angular as the main frontend/renderer
Understanding the main process and renderer process
What is Angular?
Why use Electron JS and Angular together?
Setting up the configurations to link Electron and Angular together
Part 3: Creating the User Interface
Creating the main process
Creating the renderer process
Creating the user interface using Angular
Part 3: Adding Functionality to the Application
Creating a service for the main process
Communicating between the main and renderer processes
Adding functionality to the user interface using Angular
Part 4: Packaging and Distributing the Application
Packaging our application for distribution
Creating an installer for the application
Distributing the application to users
In the final part of this series, we’ll be packaging and distributing our application. We’ll go through the steps to package our application for distribution, create an installer for the application, and distribute the application.
Getting Started with Electron JS
Before we dive into building our first Electron application, we need to make sure we have the necessary tools installed. Here’s what you’ll need:
Node.js
NPM (Node Package Manager)
You can find it on NodeJs official website nodejs.org
NPM is included with Node. js installation. After you install Node.js, you can verify NPM installation by writing the following command in the terminal or command prompt:
npm -v
you will receive something like this:

which tells you the version of npm.
Now that we have Node.Js installed, we can create our first Electron application. Here’s how:
1. Create a new directory for your project, navigate to it and in your terminal initialize a new Node.js project with the following command:
npm init
2. Next we want to install Electron.Js:
npm install electron --save-dev
Your package.json file should look something like this:
{
  "name": "my-desktop-application",
  "version": "1.0.0",
  "description": "Hello World!",
  "main": "main.js",
  "author": "Whoever is reading this",
  "license": "MIT",
  "devDependencies": {
    "electron": "22.0.0"
  }
}
after initializing your package and installing Electron. You should also now have a node_modules folder containing the Electron executable, as well as a package-lock.json lock file that specifies the exact dependency versions to install.
3. Create a new file named main.js in the root of your project directory.
This file will contain the main process code for your Electron application.
const { app, BrowserWindow } = require('electron');

function createWindow() {
  const win = new BrowserWindow({
    width: 800,
    height: 600,
    webPreferences: {
      nodeIntegration: true
    }
  });

  win.loadFile('index.html');
}
The createWindow() function loads your web page into a new BrowserWindow instance.
4. Create a new file named index.html in the root of your project directory.
This file will contain the HTML, CSS, and JavaScript code for your Electron application.
5. Add the following code to index.html to display a basic web page:
<!DOCTYPE html>
<html>
  <head>
    <meta charset="UTF-8">
    <title>My First Desktop App</title>
  </head>
  <body>
    <h1>Hello, Electron!</h1>
  </body>
</html>
6. Now inside the main.js insert after createWindow();, this function tells the app when it’s ready to initiate.
Basically, this will create a promise, in which, if it is successful, we call inside the callback the createWindow(); function.
// --- Rest of code above --- //

app.whenReady().then(() => {
  createWindow()
})
We want to also create the functionality for when to quit the application and close it. On Windows and Linux, closing all windows will generally quit an application entirely. To implement this pattern in your Electron app, listen for the app module’s window-all-closed event, and call app.quit() to exit your app if the user is not on macOS.
Insert this code after app.whenReady():
app.whenReady().then(() => {
  createWindow()
})

app.on('window-all-closed', () => {
  if (process.platform !== 'darwin') app.quit()
})
The app object represents the Electron application. When all windows are closed, the window-all-closed event is triggered, and the callback function is called.
In this case, the callback function uses a conditional statement to check if the platform is not macOS.
The
process.platformproperty returns the platform the application is running on, anddarwinis the identifier for macOS.
If the platform is not macOS, app.quit() is called, which quits the application. This is because on macOS, it is common for applications to stay open even when all windows are closed, but on other platforms, it is usually expected that the application will quit when all windows are closed.
Now the final step:
7. Run Electron
The main process in Electron is a Node.js runtime, which means that you can run any Node.js code using the electron command.
To do so, you need to add electron . to the start command in the scripts field of your package.json file. This command instructs the Electron executable to locate the main script in the current directory and execute it in dev mode.
{
  "name": "my-desktop-application",
  "version": "1.0.0",
  "description": "Hello World!",
  "main": "main.js",
  "author": "Whoever is reading this",
  "license": "MIT",
  "scripts": {
    "start": "electron ."
  },
  "devDependencies": {
    "electron": "22.0.0"
  }
}
and finally:
npm run start
This will initiate electron and in the end, we will have a browser window like this:
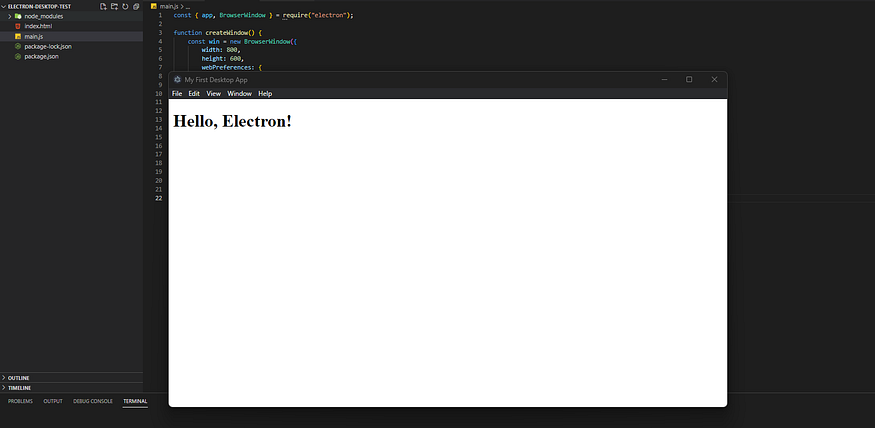
I’ve chosen to use VS Code as my code editor for this project. On the left-hand side, you can see the project files, and on the right, you can see the Electron-generated browser window displaying the “hello” message we added to its HTML file. Additionally, there’s a menu toolbar included in the build, but we’ll cover how to edit it in our preferences later on.
Congratulations!! You have executed your first line of code in Electron!
In the next section, we will learn how to create user interfaces using HTML and load them into a native window with any changes made. Initially, we’ll only use JavaScript for the main renderer (frontend), and later on, we’ll switch to Angular.
Thank you and keep reading to learn more! See you at the next one.